Foam rolling – is it a waste of time?
It seems whatever gym or health club you walk in to, you’re bound to see people rolling around with a look of pain on their faces as they incur the torture of the foam roller.
Ten years ago, when I first started out in the fitness industry, it was difficult to find any gym that had foam rollers… now, I can guarantee you’ll struggle to find a gym that doesn’t have them.
So why the sudden boom, and what attracts us to want to roll around on the floor using something which quite frankly, causes me to grit my teeth in an expression of pain?
Well the answer lies in releasing myofascial – a fancy way of saying: improving the flexibility of the fascia tissue that surrounds our muscles.
Foam rolling, or Self-Myofascial Release (SMFR) as it’s more commonly referred to in the fitness industry is the term given to a specific form of manual therapy that is intended to release the fascia tissue, allowing for an improvement in range of motion and flexibility. Many trainers and therapists will recommend foam rolling as a way to improve flexibility, reduce muscle soreness and ‘break down the fascia tissue.’
I’ll be the first to admit, ten years ago when I use to recommend to clients they ‘rolled out’ I used to say:
“it was like using a rolling pin to roll out dough,” and told them that:
“a foam roller essentially helps to roll out clumped up and knotted fascia tissue to help reduce adhesions and make it more elastic.”
Oh how wrong I was, as now we now know that’s not the case! Advances in science have shown us we cannot simply ‘release’ fascia. Not unless you apply 2000lbs of force per square inch (Lawrence A. 2016), something I’m pretty sure a foam roller cannot deliver… I know it hurts but that pain would be something else entirely.
So, if we’re unable to release this fascia manually, why do we see noticeable changes in flexibility and the way our muscles feel when we roll? As let’s be honest, several minutes on a foam roller and we feel great.
Well, the mechanism by which self-myofascial release works is unclear. Currently, the best evidence supporting it points towards a neurophysiological mechanism involving muscle activity for acute changes, in other words, maybe it’s all in our heads. Rolling on a roller sends signals to our brain, which in turn tells the central nervous (CNS) to relax the muscle.
Physically, you do increase blood flow to the rolled-out area, which will help to turn over any metabolic waste and help push through new oxygenated blood, having a positive effect.
Now if foam rolling works through a neurophysiological mechanism, does this mean the results people observe are a placebo, let’s take a look shall we?
• Improvements in range of motion and flexibility
It seems there is evidence to show foam rolling does lead to greater improvements in range of motion and flexibility, however these improvements are short lived.
When I say short lived, I mean the benefits in ROM after having foam rolled only seem to last for up to 10 minutes (Škarabot J et al. 2015). Nevertheless, if you intermittently foam roll after static stretching then these improvements in flexibility can last significantly longer (Behm, D. 2017).
There’s also evidence to show that there’s a cross-over flexibility effect. This means if you were to work on rolling out one area of the body, you would see improvements in another area (to a lesser extent than rolling the specific area).
Grieve et al. (2015) assessed the effects of using a tennis ball to roll out the bottom surface of the foot and subsequently reported improvements in hamstring flexibility.
Kelly & Beardsley (2016) found increases in the opposite ankle after the leg was foam rolled, suggesting a cross-over effect.
• Improvements in muscle soreness
Here at Hall Training we recommend you spend a couple of minutes after your session rolling out the muscles you’ve just worked to help reduce what’s known as “Delayed Onset Muscle Soreness” or DOMS. Research has found that spending time rolling out after exercise does lead to a dramatic drop in pain caused by DOMS (Vaughan and McLaughlin. 2014) (Pearcey GE. 2015).
– the only caveat here is the time needed to significantly see a reduction in pain associated with DOMS is anywhere between 3-20 minutes.
• Improvements in performance
Historically, many strength coaches would prescribe static stretching prior to resistance training to help athletes increase their ROM and improve joint mobility. However, improvements in ROM are only really observed when stretching for 45 seconds or more, which also the time when static stretching can produce undesirable short-term reductions in athletic performance – decreased strength and increased risk of injury (Kallerud and Gleeson, 2013).
One of the reasons foam rolling has taken off is its ability to increase flexibility without having detrimental effects on performance (Sullivan, K.M et al. 2013) (Behm, D. 2017).
• Possible improvements in cardiovascular system
I have emphasised the word ‘possible’ here as it’s the only study of its kind and with a small sample size but, scientists in Japan found the use of foam rolling led to improvements in arterial stiffness of the lower leg and improvements in Peripheral Artery Disease (PAD), a disease in which the arteries in your legs or arms are narrowed or blocked, which leads to poor circulation and risk of stroke of heart disease (Okamuto. 2013).
So there you have it, the real reasons why foam rolling has an effect on our flexibility, and a few other bonuses that are associated with it. All-in-all, it’s not so much of a waste of time.
My important and easy take home points:
1. For improvements in acute flexibility and ROM
As little as 5-10 secs of rolling is needed – easy (Sullivan, K.M et al. 2013).
I you require greater increases in flexibility that last longer (more than 10 minutes) then:
• 30-60 secs of rolling is required to which you can combine with 30-45secs of static stretching (Škarabot J et al. 2015) (Behm, D 2017).
2. For reduced muscle DOMs
Foam rolling for at least 3 minutes and up to 20 minutes after training seems to be required (Vaughan and McLaughlin. 2014) (Pearcey GE. 2015).
3. Improvements in flexibility without a detriment to performance
Foam rolling prior to training 30-60 seconds. Can combine with static stretching for further increases in ROM but keep to under 1 minute (Sullivan, K.M 2013) (Behm, D 2017).
4. Improvements to cardiovascular health
Although there is evidence to suggest foam rolling can lead to improvements in circulation and CV health, it does require you to roll 30 minutes at a time, something I feel is a little long and rather dull – your best bet would be to go out for 20-30 minute stroll, as the effects will be similar (Okamuto. 2013).
5. In a hurry…?
Then take advantage of cross-over effect – roll out the bottom of your feet to help release the hamstrings (Grieve et al. 2015) or, if you roll out one leg you’ll see improvements in the other leg too (Kelly & Beardsley 2016).
Attention: if you’re still someone who’s spending time rolling out their IT Bands then stop! As you really need to look at this before you continue wasting your time.
If you’ve come across something known as the IT band, then you will probably have heard a number of different and conflicting terms used to define both what it is and its purpose.
If you’ve never heard of it then great, as the below is all you need know!
Firstly, let me tell you what it isn’t!
The IT band isn’t:
• anything to do with IT, and provides no use whatsoever for computing or electronics
• the latest pop or rock band to hit the UK charts
• nor is it a type of radio frequency
So what do people think it is?
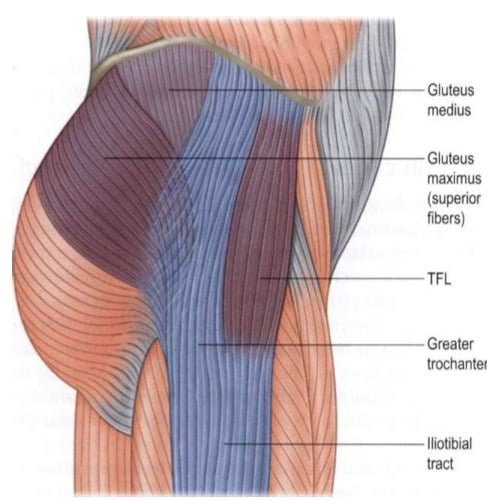
Well, the IT band, or “ITB”, refers to the Iliotibial Band. Now most people in the fitness industry will tell you the ITB is “a ligament that runs down the outside of the thigh, from the hip to the shin.” You may also hear trainers refer to it as “a muscle”, however, both statements are false.
For starters, ligaments are used to connect bone to bone, and if you know anything about the IT band and where it originates, you’ll know it doesn’t attach itself directly onto a bone.
It’s also important to note the IT band isn’t a muscle, but based on the way personal trainers talk about stretching it and rolling it, you could be forgiven for thinking it is. Whether other personal trainers realise it or not, the IT band is neither a ligament nor a muscle.
But what is it really?
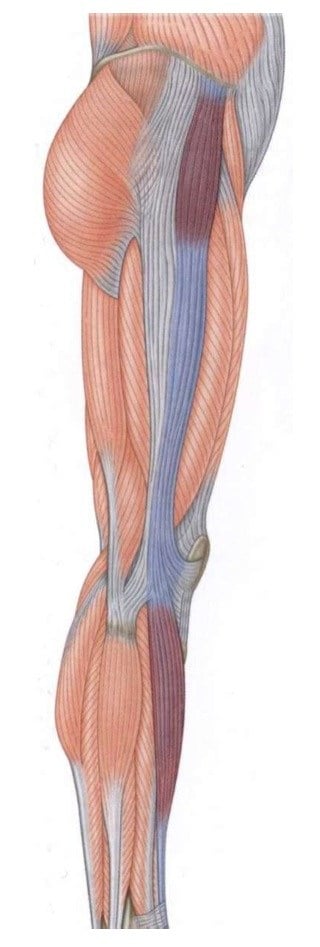
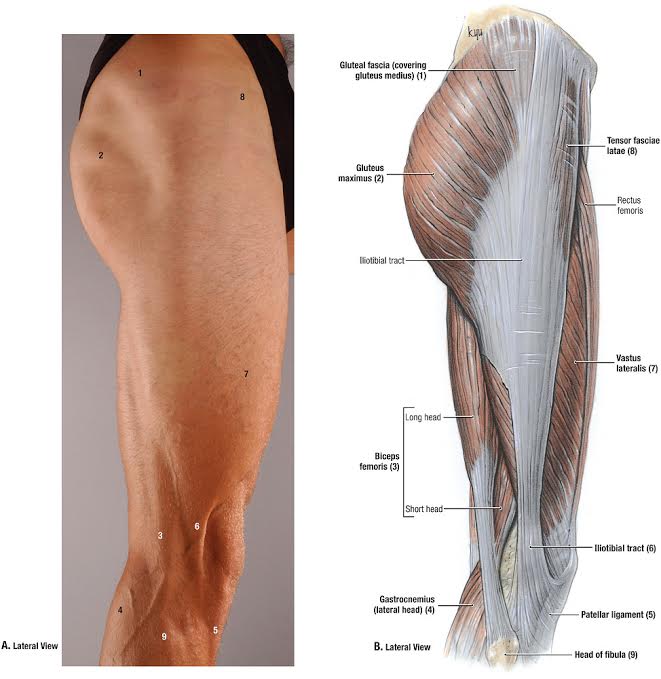
The IT band is made up of fascia tissue, and multiple muscles insert onto IT (see what I did there). The two major muscles that make up the IT band are the gluteus maximus and the tensor fascia latae (TFL), which make up both the anterior and posterior portion of the band at the hip.
(image from Anatomy Trains by Tom Myers)
The IT band then runs the length of your thigh and inserts onto the lateral aspect of your tibia – a fancy way of saying to connects to the outer part of your shin bone. Down here, the anterior portion of the IT band connects onto the tibialis anterior, while the posterior portion connects onto the peroneus longus.
(image from Anatomy Trains by Tom Myers)
Its function is therefore to make a connection between these muscles, the TFL and the tibialis anterior, and another connection between the gluteus maximus and peroneus longus. This connection helps to transport force from the lower extremity to the upper extremity – i.e. the knee to the hip and vice versa, as well as providing stability at both the hip and the knee.
As you can now see, the TFL, gluteus maximus, tibialis anterior and peroneus longus insert into this band creating one long fascial tendon, which has the same contractile force of steal.
Complaints of having a ‘tight IT band’ are often confused with having tightness in the surrounding muscles. Due to the structure of the IT band, we now know it cannot become ‘tight’.
Due to the makeup and density of the IT band, methods such as foam rolling, stretching and even massage used to help release it are worthless, and will only bring about extreme pain with little to no success.
Instead, focus should be given to the muscles that insert onto the band such as the TFL, which can become extremely tight and overworked if there’s an imbalance between the TFL and tibialis anterior (remember these two muscles are connected on the anterior portion of the IT band).
You’ll find runners tend to have the biggest problems with IT band pain; as Whitey Lowe explains:
“the IT band is under its greatest tension during the first third of the stance phase in running or walking. There is increased tension on the ITB when decelerating the body’s momentum, such as walking or running downhill.”
If a runner over-strides, with the foot striking well in front of the hip, then the heel and leg must act as a braking mechanism before then accelerating off. Over-striding can place unnecessary force through the IT band, and if the glutes are weak or underactive then the TFL will absorb a lot of this force at the hip.
The other muscle to look out for is the vastus lateralis (the outer muscle of your thigh). This muscle lies underneath your IT band and if tight, can place pressure against the IT band, causing discomfort. Resistance training specialist, Michael Goulden, from Integra Training has found that releasing or foam rolling the vastus lateralis helps to relieve many cases of a ‘tight’ IT band.
(image from http://web.duke.edu/)
So, there you have it! You now know the IT band isn’t a ligament, a muscle or a poorly named 80s pop band.
Instead, it’s a band of fascia tissue made up of a number of muscles all inserting into it. We also know that if pain arises in the IT band that it’s not the band itself, but an imbalance between the muscles surrounding the band, namely the TFL and vastus lateralis being too tight, and the glutes max (more than likely) being too weak.
Next week, I’ll be delivering a video on how you can stretch the ‘IT band’ or rather the muscles that make it up to help effectively reduce the symptoms of typical ‘ITB Syndrome’.
How many calories do we burn when weight training?
Today’s Friday Fun Fact is a question I’ve wanted to find an answer to for a while: just how many calories do we burn when weight training?
Heart rate monitors and fitness trackers can provide us with some basic numbers, and are great at determining how many calories we’re burning during some light to moderate cardio work, but when we do any strength training or perform high intensity interval work, they’re pretty useless!
You see, heart rate monitors estimate our energy expenditure through the linear relationship between power output (how much work you’re doing per unit of time) and the amount of oxygen consumed (which is equivalent to energy expenditure during aerobic exercise). Because the relationship between heart rate and oxygen consumption is linear, you can use your heart rate to estimate total energy expenditure.
However, this linear relationship crumbles under very high intensities, like when you’re sprinting or doing some resistance training, which is why they’re not reliable.
When it comes to measuring these kinds of activity, fitness trackers aren’t much better. Although they may sense movement, they have no way of determining how much load (weight) you’re lifting. For example, a Fitbit worn on the wrist will likely show the same number of calories burnt whether you perform a squat with ten kilos or a hundred kilos – not very rewarding for you.
So how can we estimate energy expenditure during resistance training?
Before answering the question it’s important we highlight the word “estimate,” or rather, replace it with the word “guesstimate.”
When it comes to weight training, variables such as gender, age, weight, loading parameters, programme design (traditional sets vs. supersets) load on the bar, range of motion etc. will all have an impact on the amount of energy used during a session. So, when we look at this we can only really guesstimate the number of calories based on the evidence that’s been documented in the literature.
When we look at the literature the number of repetitions performed is our best predictor at guesstimating energy expenditure in each session.
• A study by Kelleher et al, comparing supersets to traditional sets, found the total energy expenditure ranged from 260 to 279 calories across 240 reps – that’s about 1.1 calories per rep.
• A study published in the Journal of Strength and Conditioning Research looking at eight single set exercises found energy expenditure to range between 70 – 135 calories across 120 reps – that’s about 0.6 calories per rep.
• Hunter et al, took subjects through 8-10 exercises for two sets each (total of 160 reps), and found their average energy expenditure to be 113 calories – that’s 0.7 calories for each rep.
• Lastly, a study that looked at the relationship between rest intervals and total number of calories burnt on a leg press over five sets of 10 reps (50 reps) found an approximate energy expenditure of 90 calories – 1.8 calories per rep. However, when the same subjects then performed dumbbell chest flys for the same number of sets and reps, only 50 calories were burned – 1 calorie per rep (Farinatti, 2011).
As you can see there’s quite a range, with majority of the literature suggesting you burn between 0.5 and 1 calories per rep.
How do you know whether it’s really 0.5 or 1 calorie per rep?
To guesstimate the total number of calories you’ve used during a session I would hazard a guess using the following guidelines:
1 rep = 1 calorie when:
• Favouring super sets over tradition single sets
• As part of a circuit
• Compound exercises in favour of isolation exercises
• Larger muscles over smaller muscles
• Sufficient load is used i.e. nearing repetition maximums
• Rest intervals are incomplete
• Using stimulants pre-workout, such as caffeine before training
1 rep = 0.5 calories when:
• Single sets are performed
• Rest intervals are longer (+1 min)
• Smaller muscle groups are utilised
• Lighter loads are used
• The majority of your session is built around isolation work
The next time you’ve finished a workout and slumped over in a corner of the gym waiting to catch your breath, take a moment to tally up your reps, and match them against the points above to see how many calories you’ve burnt – it may just motivate you crank out a bonus 5 sets of 20 reps on the leg press as a finisher – after all, that’ll be 100 extra calories you’ve just used!
The five factors of optimal exercise selection
Following on from his last blog post on Hypertrophy mistakes everyone makes and how to avoid them, our personal trainer George looks at five key factors for exercise selection. A warning, this one is pretty in-depth, but will be perfect for anyone looking to improve their anatomy or hypertrophy knowledge. If it goes over your head, don’t panic! It’s up to your personal trainer to have this knowledge and make it work for you.
You’ve all heard of programme design, but how about exercise design? It’s probably not something you’ve come across, but hopefully come the end of this blog post you’ll have a few more tools in your belt to start tinkering with some of your favourite exercises. Heck, you might even need to throw some out completely!
Just to be clear before we begin, using only one or two of the following factors to explain something is likely going to get you into trouble, the key is to understand all pieces of the pie. After all, if all you have is a hammer, everything looks like a nail.
Most of these topics aren’t mainstream and they’re pretty ‘un-Instagramable’ – so, settle down, buckle up and prepare to have your mind-blown!
I’ve popped in a couple questions just to lighten things up – you’ll find the answers at the very end.
Joint Mechanics
Understanding joint mechanics gives you an indication of where an exercise increases and decreases in perceived weight throughout a movement.
It’s important to know the distance of the load from the axis, in our case, the joint; the further the weight is from the joint, the heavier the load ultimately becomes, so more force has to be imparted by that muscle. This is effectively what moment arms are.
A note on cables; cables create a constantly changing force angle on the lever (arm). That is, the load will appear to be heaviest when the cable is at 90o to the arm – play around with this yourself and let me know what you find.
Example: A dumbbell fly is fundamentally the same as a dumbbell press but with the lower arm extended, increasing the moment arm and making the load ‘heavier’.
Question 1: Which creates more torque at the joint; 5kg held horizontally at 0.5m or 5kg held horizontally at 1m?
(hold that thought, answers can be found below)
Muscle Mechanics
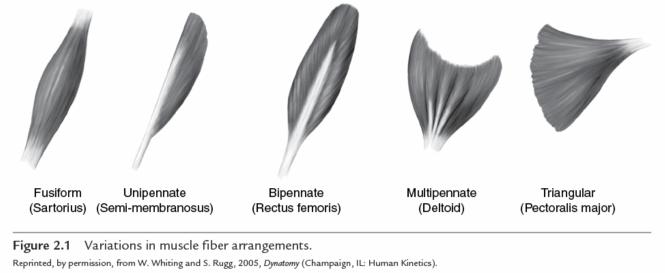
A muscle is not a muscle! Throughout the body, we have a number of different muscle types, and I’m not talking fast twitch vs. slow twitch here. Muscle fibres only pull in the direction in which they run, due to fibre direction and insertion points, each type differs in where its max strength lies.
Fusiform – e.g. Biceps
- One line of pull – fibres run directly from one end to the other, converging at a common origin and insertion
- Provide a contractile ability that is strongest in the midrange. Their strength curve almost replicates your typical bell curve.
- Provides more range of motion and speed, but reduced force capability
Pennate – e.g. Quadriceps, Hamstrings, Triceps, Deltoids
- Contain a mini-tendon within the muscle belly – muscle bellies within muscle bellies ey’! Their fibres run ‘slanted’ between these tendons, therefore do not contract directly from origin to insertion.
- Have an increased advantage to pull in a more lengthened position
- Suffer a drastic drop off in advantage as the muscle contracts and shortens
- Provides less range of motion and speed but higher force capability
Convergent – e.g. Pectorals, Latissimus Dorsi
- Originate at varying points and converge at a single insertion, therefore provide an almost infinite number of lines of pull
- Have a greater advantage in a more lengthened position due to the fibres having a better line of pull towards the originQuestion 2: Which muscle type(s) might benefit from a higher proportion of lengthened loading?
Resistance Profiles
Resistance profiles shows how tension/force changes in the muscle throughout the range of motion of a particular exercise in isolation.
Going back to our above example, a dumbbell fly is increasingly heavier the further the load (weight) gets from the joint, and lighter the closer it becomes.
Strength Curves
The typical bell curve we all associate with strength curves is correct, well 80% correct. However, the muscle mechanics we spoke about earlier have the ability to shift our strength curve more toward an extreme range advantage, shortening the curve entirely or increasing the total peak tension.
Question 3: How does the strength curve for a pennate muscle differ from the others?
Neuromechanics
What you intend to do with the weight is vital to where tension is placed! A steady and controlled movement of an object has a constant mass throughout, whereas acceleration causes something to feel heavy from the start and lighter as it begins to move.
In order to overcome some gaps caused by all four of the previous factors, we can add in the use of momentum and design a more effective exercise. Just to add; ‘explosive’ and ‘accelerating’ do not mean throw!
Example: Dumbbell lateral raises are ridiculously hard at the top. We can accelerate the weight through to the top, where it naturally gets harder.
Information Overload? Where Do I Start?
I know, I get it – it may take a couple of reads and a few weeks of mulling over (it will, trust me). But truly understanding each of these areas and being able to instinctually integrate them into your programming is THE ultimate skill! Giving you the principles behind these five factors and how to use them is far more beneficial than giving you specific ‘to-dos’.
Going back to our original statement; “The most effective exercise for a given muscle is one that has the ability to perfectly match the output capability of that muscle throughout its entire range of motion.” – as I briefly explained in my last blog.
Maximally efficient exercises and ultimately, workouts, can be achieved by understanding how each of these factors interact with one another, and then making adjustments accordingly to match output capability.
Here are some examples to get you started…
Example 1: If an exercise is hardest where a muscle is mechanically weaker, it might be beneficial to decrease the difficulty there OR increase the difficulty where the exercise is easiest to balance things out.
Example 2: If a muscle is drastically stronger in a more lengthened position, it might pay to spend more time there with some partial reps.
There we have it – I did say only understanding one or two of these would get you in trouble, didn’t I?
“The more I learn, the more I realise how much I don’t know.”- Albert Einstein
Answers
Q1: 5kg held horizontally at 1m
Q2: Both pennate and convergent
Q3: More force created but over a shorter range of motion
Internal Cues: Bridging mind to muscle
Last Friday I talked about the mind-muscle connection, and how if we think about a specific muscle working, we can in fact increase its activation and the amount of force or effort it’s exerting on a load.
Today, I want to talk about how we can spark this link from mind to muscle and establish this all important connection.
It’s no secret; people who are new to training tend to have a poor biomechanical feedback mechanism, meaning they find it difficult to feel a muscle when exercising it. As their training age progresses, so too does their ability to engage the right muscle for the exercise.
In all the years I’ve been a personal trainer I’ve (typically) found the muscles we’re unable to see i.e. our glutes, lats, upper back and hamstrings, tend to be harder to feel and engage compared to those that we can see, such as the biceps, quads, abs and shoulders.
So, how can we teach people to start engaging their muscles and to improve their mind-muscle connection?
Well there are two tricks we can use,
1.Internal and External Cues
2.Touch
all of which have proved to be very beneficial. But today I want to talk about internal and external cues.
Cues can typically be categorised into those that have an internal or an external focus. Internal cues are instructions that direct a person’s attention towards a part of their body, such as muscles and joints. External cues have a more external focus, instructing a person to focus their attention on their surroundings, outside of the body. These are generally used when the goal is to produce power or increase performance.
Generally speaking internal cues help to:
• maximise muscle contraction
• maximise muscle activation
• improve technical form
whereas external cues help to:
• maximise strength
• maximise power, speed, velocity and acceleration
• maximise precision and coordination
External cues have been shown to be far superior to internal cues for maximising performance (Bredin, Dickson & Warburton 2013). If you’re an athlete or competitive sportsman/woman then focusing mainly on external cuing would certainly be the way to go however, we’re not athletes (well, I’m certainly not).
Most of us are simply looking to be able to effectively activate certain muscles in the right order, at the right time – cue internal cueing.
For years, bodybuilders have been implementing the use of internal cues to help improve the mind-muscle connection. Research has shown by directing your attention and focus internally to a muscle or joint you can increase a muscle’s engagement and the level of contraction (Snyder & Fry. 2001).
Here at Hall Training, we often provide internal cues to our clients to help them to feel and engage certain muscles.
Here are just a few we like to use:
The Lats:
When performing a lat pulldown, we encourage the client to keep their chest up and imagine driving their shoulder blades back and down into their hips, leading with the elbows – internal verbal cues help to increase latissimus dorsi activity compared with no cue (Snyder 2009).
The Glutes:
For glute engagement, we encourage the client to imagine they’re trying to crack a walnut when coming up into hip extension, or to imagine they have a five pound note between their buttocks which they’re trying desperately to keep a hold of – both cues really help to keep the glutes squeezed and muscles contacted. Researchers have reported providing internal cues during a hip extension led to increased muscle contraction (Lewis et al. 2009).
The Pecs:
When performing a bench press, it’s common for most people to feel it in their triceps or shoulders rather than the muscle they’re trying to work, which would be the chest. By instructing the client to push their hands together against the bar as they push upwards, along with imagining the two elbows coming together in an arch motion, it’ll make the exercise more focused on the chest muscles.
Research has also concluded that in response to chest cues, subjects were able to increase the amount of activity (22% increase) placed through the chest muscles during the bench press (Snyder & Fry. 2011).
The Biceps:
For men this is never really an issue, but females tend to have a hard time contracting their biceps. Why? I have no idea, maybe because they’re not as vain as us men! Anyway, one trick we use is to imagine the elbow coming up to meet with the shoulder when performing a bicep curl, and then really squeezing it at the top like a balloon, imagining you’re trying to pop it – these internal focuses help to increase bicep activation and recruitment.
So, there you have it; a few little tricks to help bridge the connection between mind and muscle. The next time you go to the gym, try directing your attention away from what’s around you and start thinking about what’s going on inside you… you never know, it may just help you to feel muscles you never knew existed.
Five things we learned about fitness in July
This month our level 4 trainer, Pete reviews the latest fitness and nutrition research from July. This month, Pete looks into how much protein you need to build muscle strength and size – more isn’t necessarily better. Can caffeine actually make us stronger… and how a simple trick can increase the recruitment of your glutes in a squat.
So pop the kettle on, sit back and enjoy!
1. Periodising your training will make you stronger
OK, so here’s something some of you may have been wondering. Is it actually worth getting a proper periodised training programme from a personal trainer instead of just rocking up to the gym and doing a workout? Well, this month Williams et.al conducted a meta-analysis (a study which examines the results of lots of different studies) looking at whether periodised models elicited a greater increase in maximal strength as opposed to non-periodised methods. And the answer is . . . yes they do! The results of multiple studies corroborate the findings that periodisation of programming saw a greater benefit for maximal strength in upper body and lower body multi-joint movements.
I was very happy to read that all the time we spend writing out weeks of programme cycles for clients will be helping them to achieve their results faster.
2. Protein supplements will help your gains
The easiest way to think of this second study is as the daddy of studies into protein supplementation! It is another meta-analysis that took data from 49 studies and evaluated the results in order to ascertain the:
“effect of protein supplementation on resistance training-induced gains in muscle mass and strength in healthy adults”.
Clearly, with so many studies included in the analysis, there was a great deal of variation with regard to the subjects that were used; there were a few studies who used trained individuals but the majority of the interventions were carried out on un-trained subjects. All of the studies had the subjects training ≥ 2 times per week, and lasted for between 4-52 weeks. The majority of the studies supplemented with whey protein but soy, casein, pea, milk, whole foods and protein blends were also used. It is also important to note that although the protein intake was increased the total daily energy intake did not increase.
The meta-analysis revealed that:
“protein supplementation increased 1RM strength (by 2.49kg), fat-free mass (by 0.30kg), muscle fiber cross-sectional area (by 310μm2) and mid-thigh muscle cross-sectional area (by 7.2mm2).”
What these numbers show is that adding supplemental protein will aid with both size and strength.
The type of protein did not seem to have a significant effect on the results, and it’s also interesting to note that there did not appear to be any benefit of increasing protein above 1.6g per kg of bodyweight every day.
3. Will caffeine make me strong?
When you read this title I’m sure that many of you are thinking “please say yes!!”. Caffeine has been studied lots regarding endurance, but not as extensively when it comes to maximum strength. This month we had a study that looked into precisely that, and what’s even more exciting is that the subjects of the study were trained individuals (as often studies will be done with untrained individuals).
In summary, the results showed that ingesting caffeine had an acute impact on maximum lower body strength and on maximum upper body high-velocity strength. It was surprising that there appeared to be no reason as to why maximal lower body strength was increased but the same was not true about maximal upper body strength.
For those of you who are keen to pop this bit of info into practise, the numbers used in the study were 6mg of caffeine per kg bodyweight and it was ingested 1 hour prior to training.
4. Should we ban(d) squats to target the glutes?
Sorry for the teasing title and for getting a few hopes raised the research had shown that everybody should stop squatting immediately! Unfortunately not, this piece of research is actually about what we can do to get more bang for our buck from the squat. The aim was to find out whether popping a band around the upper thighs would increase glute activation, and to see if it would have any effect on the number of reps that could be performed at a given weight.
Interestingly, the only effect that was seen through adding a band was that EMG for the gluteus maximus and gluteus medius were increased for both the eccentric and concentric phases of the squat. EMG amplitudes for the bicep femoris and vastus lateralis were unchanged when the band was added. There was also no change in the amount of reps that could be performed at either 80% or 60% of 1 rep max.
All in all, if you have a resistance band and you’re looking to get a bit more glute work into your training, try popping it around your thighs when squatting and it will make the glutes work harder without negatively affecting other muscles.
5. Train quicker to get faster
Here’s an interesting one with slightly surprising results! This final piece of research was designed to compare the effects of different forms of hamstring training on strength, activation and sprint performance. Some of the subjects carried out low volume training with a heavy load but low velocity while others used a resistance band at high velocity. As you would expect, the heavy load training increased 1 rep max strength on the leg curl while there was no difference in the banded group. However, when sprint times were measured both from a static and a flying start, the banded group improved on both, while the subjects using the heavy load saw no improvement. High-velocity training seems to have a better transfer to high velocity athletic activity. If you want to be quick then train quick!
References
1. Williams, T. D., Tolusso, D. V., Fedewa, M. V., & Esco, M. R. (2017) Comparison of Periodized and Non-Periodized Resistance Training on Maximal Strength: A Meta-Analysis. Sports Medicine.
2. Morton, R. W., Murphy, K. T., McKellar, S. R., Schoenfeld, B. J., Henselmans, M., Helms, E., Aragon, A. A., Devries, M. C., Banfield, L., Krieger, J. W., & Phillips, S. M. (2017) A systematic review, meta-analysis and meta-regression of the effect of protein supplementation on resistance training- induced gains in muscle mass and strength in healthy adults. British Journal of Sports Medicine.
3. Grgic, J., & Mikulic, P. (2017) Caffeine ingestion acutely enhances muscular strength and power but not muscular endurance in resistance-trained men. European Journal of Sport Science, 1.
4. Spracklin, O. F., Button, D. C., & Halperin, I. (2017) Looped Band Placed Around Thighs Increases EMG of Gluteal Muscles Without Hindering Performance During Squatting. Journal of Performance Health Research.
5. Janusevicius, D., Snieckus, A., Skurvydas, A., Silinskas, V., Trinkunas, E., Cadefau, J. A., & Kamandulis, S. (2017). Effects of High Velocity Elastic Band versus Heavy Resistance Training on Hamstring Strength, Activation, and Sprint Running Performance. Journal of Sports Science and Medicine
Mind-Muscle Connection: Something worth thinking about!
Many personal trainers, coaches and gym-goers seem to think that if you a lift a weight from A-to-B, the muscles involved in that lift will be activated, while others (more sensible folk) believe a muscle is only really activated in a lift when you’re thinking about it – this is known as the mind-muscle connection.
So who’s right, and do we really need to be thinking about the muscle we’re trying to work, or can we afford to let our mind wander elsewhere?
Well, the research on this topic is limited and mostly anecdotal, however I’ve managed to dig up a few studies that can shine some light on the topic.
The largest study I found was by glute expert, Bret Contreras. He took a group of subjects and using EMG data, found whether the load, cadence, and form dictated muscle activation, or whether it’s possible to mentally steer muscle activation to individual muscles using the power of the mind.
It’s very important to note that the load, speed, grip-widths, stances, bar movements and joint ranges of motion were all kept constant between the two groups as otherwise these factors would ultimately sway the outcome.
The results are somewhat surprising! There’s certainly evidence to support that the mind-muscle connection does in fact exist, but only for certain muscles:
(source: t-nation.com)
The glutes seem to have the greatest influence of recruitment, with a 32% difference in recruitment when thinking about them working to not working. During a back extension, muscle activation only reached 6% when subjects weren’t thinking about them compared to a staggering 38% when they were actively thinking about them. Overall, glute activation was a lot higher when subjects were really thinking about them working during hip extension exercises such as RDL’s hip thrusts, squats and back extensions.
Other muscles that were found to respond well to the mind-muscle link were the pecs and the triceps; focusing on the pecs while pressing limited the work the triceps had to do, placing more load through the pecs. This was easier to do when performing a push up rather than a bench press.
For puling muscles such as the back, mid-traps and the biceps it was really dependant on the movement being performed at the time. Lat activation didn’t change too much during a chin up, but they really came into play when thinking about them during an inverted row.
On the whole there is evidence to suggest there is a mind-muscle connection, and we should really think about muscles working if we want to improve the amount of work they’re contributing in a lift. However, there are a few other things to bear in mind:
- The amount of weight being used – steering your thoughts to a muscle when using lighter weights seems to a lot easier to do than when lifting heavy weights (Snyder & Fry 2012), this may be why the push up trumped the bench press.
- How experienced you are – as with anything, practice makes perfect. Typically, people who are new to training tend to have a poor bio-mechanical feedback, meaning they struggle to feel muscles working when performing an exercise. As your experience in the gym grows, so will your ability to start thinking and contracting your muscles during certain movements. This should then lead to better progression and recruitment! (Moreside JM et al. 2008)(Sumiaki Maeo, Takumi Takahashi et al. 2014).
So there you have, and I personally believe the mind-muscle connection does exist as we see it day in and day out with our clients too. A great way I explain this to clients is to look at the connection like revising for an exam:
When you revise for an exam, it’s one thing reading the information you need to learn, but just because you’ve quickly read it doesn’t necessarily mean you’ve understood it or will even able to recite it. However, if you think about what you’re reading and really visualise it, then you’ll have a much greater understanding and retention rate – muscles are no different. Think about the muscle you’re trying to work and really hone in on it. I guarantee it’ll add a whole new dimension on to your training.
Next week I’ll be talking about how you can create this link between mind and muscle.
Five things we learned about fitness in June
From eccentric and concentric training, to blood flow restriction and hamstring training, June’s fitness research has covered it all. Our level 4 trainer George has sifted through it all to bring you some gems you can apply to your own training straight away – enjoy!
1. Eccentric training beats concentric training – over a long time period
A recent meta-analysis study – which is the epitome of all studies and one we should definitely listen to – showed that with equal volume, eccentric-only training produced marginally greater increases than concentric-only training. Now, although the increase was relatively small, it would make sense that over time (I’m talking years) we’d likely see an exponential gap form between the two different methods.
As muscles are able to contract against more load during the eccentric, with less energy expenditure for an equal amount of mechanical tension (volume load), the eccentric proves to be of definite importance to any workout – especially hypertrophy and strength programs.
So what should you do with this information? Well, I’m certainly not advising removing concentric contractions. Both eccentric and concentric are essential elements in your training routine. They’re not even different methods, they’re just the two different phases of a rep, so make sure your training covers both. After all, it’s not likely that you’d ever perform just eccentric reps without the concentric – deadlifts would be off the cards!
2. The jury’s out on making bloodflow restriction comfortable
If you’ve ever done blood-flow-restriction (BFR) you’ll be able to recall how uncomfortable it can get! Can we get around this by applying the wraps post exercise, instead of during the set? Typically, wraps would be applied throughout the set to prevent the build-up of metabolites within the muscle from clearing, and then be kept on for an additional 60 seconds post-set.
A recent study tested out completing normal sets, then applying wraps for 5 minutes after the set (instead of while the contractions were taking place), against the same protocol but without post-set wrapping. Results showed that very similar outcomes were found across both groups.
From this study, it was concluded that the accumulation of metabolites isn’t the cause of an increase in muscle cross-sectional area (CSA), but that the BFR causes an increase in motor unit recruitment and that’s why an increased muscle CSA would occur. Taking this, and my previous point into account, seems that an increase in metabolites hasn’t been considered as a potential cause of increased CSA. As the wraps weren’t applied throughout the sets, I’d say that only applying the wrap at the end of the set would likely have allowed much of the metabolic waste to clear. After all, muscles don’t want to be full of metabolic waste, they want to get rid of it as fast as possible and are constantly flushing out that contractile by-product. They won’t be waiting until the last rep has been completed to begin this process.
There we are; as it stands the jury is still out on the exact BFR method to use.
3. Drop sets are best for size, multiple sets are best for strength
I have no idea who came up with the drop set phenomenon but it sure was a great idea, especially as it was likely done out of pure intuition and not backed by science! Numerous studies have shown the benefits of drop sets on muscle size, and here’s the freshest member to the club.
With total load lifted being evenly matched across two different groups, the drop set group increased overall muscle cross-sectional area (CSA) by 10%, beating the 5% in the normal, multiple set group. Although the difference seems minimal, again, added up overtime this could lead to the difference between 15” & 20” pythons!
But what about rep strength instead of size? Even though in this study, drop sets proved to increase muscle CSA by an extra 5% and indicators of fatigue were higher, rep strength didn’t increase. However, in the multiple set group it did. It’s likely that a huge component of this increase would be via metabolic stress (one of the primary mechanisms of hypertrophy) due to increased metabolite build-up within the muscle during the exercise. This decrease causes lower threshold fibres to work and at a higher number of reps, resulting in greater metabolic stress.
Mechanical tension still plays a huge role as another mechanism of hypertrophy and should be varied within your training programme using a phased approach – cycling between mechanical tension, muscle damage and metabolic stress.
Because the multiple set group completed the same total load using higher threshold fibres, greater mechanical tension would have been created therefore a greater increase in strength was observed.
4. The Nail in The Coffin for No Knee Over Toes? Finally!
I’d like to think that this old cliché is dying out and hope that June’s latest study will put it to bed for good. This study pitted ‘knees over the toes’ against its rival ‘knees not-over the toes’ – I guess you’d call it?
I’m not sure whether this study was designed to describe the sheer force created by a knee over the toe approach, but please bear in mind that ‘joint stress’ isn’t a bad thing at all. I’m sure if we exchanged it for ‘joint torque’, some heads would sure turn as it sounds much more conducive to strength and hypertrophy results. Torque is all we’re ever creating around joints when we lift something – from cup of tea to max effort squat – even though the torque values do vary greatly!
All in all, less knee flexion was shown to produce less joint torque (shocker). However, taking the squat for example, you might be able to squat 100kg by flexing to 100o of knee flexion, and 120kg by flexing to only 80o but you added load to the ‘shallower’ squat and would have most definitely still increased joint stress.
Throughout a training program less knee flexion would likely show decreased gains in the quadriceps’ strength and size due to reduced torque, and subsequent muscle stress throughout its entire contractile range.
Anyway, knees over toes is about as arbitrary a measurement I think you could find.
Assuming that the elbow is effectively the knee of the upper body – why haven’t we created an “elbow must not flex further than the hand” movement? Not so crazy, right? I’d like to add that nowhere in this study were exploding patella’s noted during any of the lifts.
5. Curl away for solid hamstrings!
No, unfortunately not bicep curls but Nordic Curls, an old-school hamstring exercise. Along the lines of our founder – Chris’s post in our Facebook Community page – one recent piece of research investigated the effect of eccentric hamstring training on total hamstring strength using two primary exercises, Nordic Curls and the Russian Belt.
Hamstring strain is common in many sports – especially football – and something we want to prevent, hence the need for building rock-solid hamstrings!
Eccentric loading alone of the hamstrings using Nordic Curls and Russian Belt exercises was shown to increase hamstring strength but interestingly, only the Nordic Curl seemed to improve asymmetrical imbalance between legs.
Most Personal Trainers will focus on the hamstrings’ function during hip extension and knee flexion, thinking only about the concentric phase. It’s important to remember their role in the opposite direction, when the hip is flexing and knee extending – acting as stabilizers of those joints. The hamstrings and calves work synergistically to provide stability across the knee, and therefore act like a force decelerator as the foot strikes the floor. Without this you’d have to kiss goodbye to your poor knees!
The biggest takeaway is that both exercises are eccentric loading exercises, therefore a protocol of eccentrically overloaded prone lying leg curls should display the same result. Muscles only response to muscle tension, they’re unaware of the actual exercise performed.
There we have it – curl away for immense hamstrings!
References:
1. Schoenfeld, B. J., Ogborn, D., Vigotsky, A. D., Franchi, M. & Krieger, J. W. (2017). Hypertrophic effects of concentric versus eccentric muscle actions: A systematic review and meta-analysis. The Journal of Strength & Conditioning Research
2. Madarame, H., Nakada, S., Ohta, T., & Ishii, N. (2017). Postexercise blood flow restriction does not enhance muscle hypertrophy induced by multiple‐set high‐load resistance exercise. Clinical Physiology and Functional Imaging.
3. Fink, J., Schoenfeld, B. J., Kikuchi, N., & Nakazato, K. (2017). Effects of drop set resistance training on acute stress indicators and long-term muscle hypertrophy and strength. The Journal of Sports Medicine and Physical Fitness.
4. Kernozek, T. W., Gheidi, N., Zellmer, M., Hove, J., Heinert, B. L., & Torry, M. R. (2017). Effects of Anterior Knee Displacement during Squatting on Patellofemoral Joint Stress. Journal of Sport Rehabilitation.
5. Rey, E., Paz-domínguez, Á., Porcel-almendral, D., Paredes- hernández, V., Barcala-furelos, R., & Abelairas-gómez, C. Effects of a 10-week Nordic Hamstring Exercise and Russian Belt Training on Posterior Lower Limb Muscle Strength in Elite Junior Soccer Players. Journal of Strength and Conditioning Research.
Fitness events in Oxford across July
Not only are we lucky enough to live in one of the most beautiful cities in the country, Oxford also has a host of fitness events going on each month. Here are a few events you can check out in July!
Sunday 9th July, 10:00
Join Cancer Research’s Race for Life at the University Parks in Oxford. Open to ladies only, there’s a 5k and a 10k course, with everyone raising money to beat cancer.
Sunday 9th July, 09:50
Run through and around beautiful Adderbury (near Banbury) on a 5k, 10k or half marathon course, with plenty of off road running!
Wednesday 12th July, 19:30
This is definitely something we can get behind. Open to all levels, this one hour yoga class is accompanied by a bottle of beer. Just book a ticket, bring a yoga mat and you’re away. Tickets are £12.00
Sunday 16th July, 9:00
Burford Bolt 5/10k in Marlow
A challenging 10k course, including both tarmac and woodland in beautiful Marlow. There’s a 5k course too if you’re not feeling too adventurous!
Wednesday 19th July, 7:30
Waddesdon Manor Summer 5k
Fancy giving a 5k a go? Why not do it in the beautiful grounds of Waddesdon Manor with the Vale of Aylesbury Athletic Club??
And of course, there’s the Oxford park run every Saturday at 9am, held in Cutteslowe and Sunnymead Park.
Three hypertrophy mistakes everyone makes, and how to avoid them
In April, I took another trip to Ben Pakulski’s Mi40 Gym in Florida. Mi40 is a world-famous facility specialising in hypertrophy, and I went specifically to increase my knowledge of exercise execution, selection and unsurprisingly push some mental boundaries when it comes to effort in the process.
I want to share a few thoughts about maximising hypertrophy gains that rubbed off on me during my trip, and the top three mistakes people make when it comes to hypertrophy training. Although there are loads of studies and theories about the best way to do this, it’s pretty hard to argue with some of the most mammoth human beings I’ve ever had the pleasure of meeting. Their theories must work, right? There’s always a perfect blend of science and application, and these guys have nailed it.
There are a few main points I want to cover in this blog post. Firstly, all the personal trainers at Mi40 are sticklers for technique. Now, I’m not talking about your typical “bar must touch the chest on bench press” kind of form; it’s a totally different level of technique critique!
Secondly, none of the exercises they use are special in any way; they are simply variations of basic exercises most gym-goers will have in their exercise library. All variation is done intelligently, with a proper thought process, as opposed to variation for variation’s sake, which is something we see far too often from some personal trainers!
Lastly, knowing how to apply focused effort is key to maximising your hypertrophy gains. I say ‘how’ because it seems there isn’t an inherent lack of work being done by most gym-goers, but the focus is often misdirected.
Mistake 1: Putting Periodisation Before Exercise Execution
The importance of exercise execution in training for hypertrophy that has been somewhat neglected by many in the fitness industry lately due to the arrival of the new kid on the block – periodisation.
Bold statement alert. There’s been a lot of discussion in the personal training industry recently about periodisation, and why it is the most important element of hypertrophy training. While there is definitely serious merit to a phased approach to training in everyone’s programme, it shouldn’t be made the determining factor of whether a programme is great or not. Linear, wave or pyramid – I don’t care! Put simply, each and every one of these are methods of altering total workload (volume) across a period of time.
If you ever hear claims of the perfect programme, please turn away from the personal trainer in question, and re-read this blog post. Essentially, you could have the most perfectly periodised training programme known to man, but I can guarantee that if your execution is off, you just might as well throw that plan in the bin!
Before you address periodisation; focusing on executing exercises correctly, and maintaining that perfect execution throughout your entire workout is unbelievably important. If you aim for perfection with each rep, you’ll be open to a greater margin for error within your training, allowing for greater hypertrophy gains.
Mistake 2: Random Exercise Selection
The second element is exercise selection. This is where things get interesting and seemingly unconventional. When it comes to hypertrophy:
- Yes – Free-weight exercises can be great exercises
- Yes – You’ll likely get bigger arms doing barbell skull crushers
- Yes – Chin-ups can build you a bigger back
However, the above exercises may not be your best options for maximum hypertrophy. Stick with me here. By being clever with our exercise selection, we can design more efficient and far superior workouts. Please put aside all prejudices about your favourite exercises and read the following statement carefully.
Essentially, the most effective exercise for a given muscle is one that has the ability to perfectly match the output capability of that muscle throughout its entire range of motion.
And to those who think we’re overcomplicating things here and reply – “But people have been getting big and strong by doing compound basics for years!” – Correct, they have. But, what if we never progressed our thinking? What if we still assumed that pigeon post was the most effective way of getting a message out? I have no idea how many pigeons I’d have to send in order for you all to read this…
There’s an entire plethora of fancy adaptations you can make to achieve a more optimal exercise resistance profile such as employing resistance bands, heavy chains & varying cable angles. Although throwing a resistance band on something may get you more looks in the gym it doesn’t always make the exercise more beneficial, in fact it could be making it worse! They must be used in the right way when it comes to hypertrophy, taking a lottery approach to your exercise selection isn’t likely to get you far. I’ll be doing another blog post on selecting optimal exercises shortly – keep your eyes peeled!
Mistake 3: Misplacing Your Efforts
So, effective execution and the correct exercise selection are crucial to a good hypertrophy programme, or workout. But we’re missing the third key ingredient – good old fashioned hard work.
We need all three elements – execution, selection and effort – present in order to elicit a maximal training response. In fact, we need execution and selection in place first to even qualify to use effort!
You see, most people complete 200% workouts using 50% reps, meaning they go mad for an hour with a tonne of unnecessary sets and flamboyant zero-resistance exercises. I’ll go all in and say that if we focused a little more on selecting more efficient exercises and squeezing the last drop out of every inch of each rep, you could easily cut your training volume and gym time in half. You’d even have more time for changing room selfies!
Look around, judging by the screwed-up faces and endless grunting, it’s not a lack of intensity that’s holding you back. I see 10/10 for effort but a modest 2 for concentrated focus and effort. Actual effort is what counts, it doesn’t matter how much effort it looks like you’re putting in.
The goal isn’t to “win” the workout. The goal is to progress, and enjoy yourself along the way. If you can get that done more effectively & in less time, then it would be foolish not to. Let’s be honest, nobody relishes in the thought of ten sets of Back Squats!
Please come back and tune in soon, when I’m going to lift the veil on ‘the 5 Factors of Optimal Exercise Selection.’